Showing posts with label craft projects. Show all posts

Wednesday, October 28, 2015

Pumpkin Painting Party

Sometimes life feels like it moves at lightening speed.  You start getting really great at keeping up your blog and then all of a sudden weeks have gone by.  Its crazy how full our life can feel at times but I'm so thankful for each little moment, its all definitely a gift.  I have the pleasure each week of leading a small group of high school girls with a sweet friend.  We have just loved getting to know them, studying God's word and encouraging one another in our walk with Christ.  To help us have time to relax together and chat about life a little and get to know each other better we like to do something different and fun each month.  This month we decided on a pumpkin painting party.


Seriously, our students are the best. They are so welcoming and encouraging to one another which in turn is such an encouragement to me.  We are so grateful for these people in our life and I'm glad I get to do things like paint pumpkins with people I love.   


The first part of a pumpkin painting party is of course, picking out your pumpkin.  I love walking thru a pumpkin patch and seeing how each pumpkin is unique and different and then so beautiful all assembled together as one.  One pumpkin is great but a multitude of pumpkins makes a beautiful statement.  What a great reminder of the body of Christ.  We are each uniquely and wonderfully made but we are also made to do life together - to be united as one in the name of Christ.  And how beautiful and powerful it is when we are.


The next part of a pumpkin painting party is posing with your pumpkins and taking lots of photos together.  This is an essential step, do not leave this one out or your pumpkin painting experience will be ruined.


It was such a beautiful fall day so we opted to paint outside.  I grabbed a couple of tarps for the tables and some painting supplies.  I picked up a few paint sample sizes from Lowes which we found we liked the best for actual full painting coverage.  I also had some chalkboard paint - because you can never have enough chalkboard stuff and then some craft paints.  I also had various paint brush sizes, a few cups of water for cleaning your brush and some paper plates for paint usage.

It was really cool to see how everyone chose to paint their pumpkin, we have a talented bunch.  We also had a mini lesson on perfection built right in.  It was a struggle to want your pumpkin to be executed to absolute perfection but in the end we had to learn to embrace the imperfections and enjoy the process.
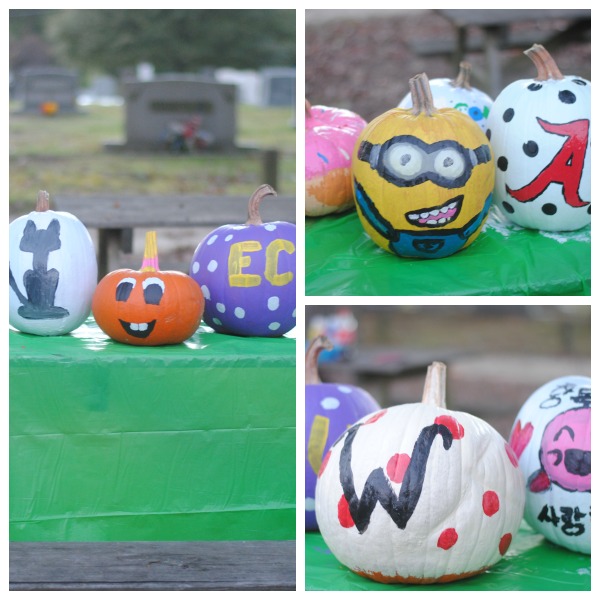

Pumpkin lessons are the best.


Hope you guys are enjoying the fall, enjoying the process and embracing imperfections while you are doing life together as one.

May the God of endurance and encouragement grant you to live in such harmony with one another, in accord with Christ Jesus, that together you may with one voice glorify the God and Father of our Lord Jesus Christ.  Therefore, welcome one another as Christ has welcomed you, for the glory of God.  Romans 15:5-7

Thursday, February 5, 2015

Easy Paper Arrow Canvas

Today I have a simple and sweet craft project to share.  If you can cut strips of paper and triangles, you can do this!


Gather your supplies:
1. A canvas (check your local craft store)
2. Modge Podge in Matte Finish
3. Scissors
4. Pretty Papers
5. Paint Brush
6. Embellishments (twine, ribbon, washi tape, etc)

-Start by cutting out your arrow strips from your pretty paper.  
-Next, apply your modge podge to both the back and front of your paper strips and place them on your canvas where you would like them.  I usually use a little more at this point and lightly brush over everything and make sure its smooth.
- Then cut out your arrowheads (aka triangles) and any fletching designs you like (arrow lingo for the back of the arrow...I googled it, I really don't have that kind of arrow knowledge)
- This is also the time to find any other embellishments you would like to add
-Modge Podge away until you have your desired arrows.
-Make sure you give your canvas one final all over coat of modge podge to seal it all together
-Give it a night to dry and you are done!


So sweet and cute for Valentine's Day or even a little girls room...or just of fun!  

PS - Don't ever try to type "modge podge" - auto correct will have a heyday. 

Monday, January 26, 2015

Kids Project: Easy Chalkboard Sign

Today I bring to you, the Silas project.  The winter days can get a little tricky sometimes with a little one indoors.  We haven't had a ton of snow this season, but it seems as though we have had a lot of cold rainy days that have kept us inside.  These are the days when you just need to be creative and find something new to do so that you and your kid don't go crazy.  One of those days recently Silas decided he wanted to paint something.  So naturally, we found something for him to paint.


  Silas is the kind of kid who could care less about craft projects.  If he makes a few squiggles with a crayon he is pretty much tapped out on crafting.  But, if he gets to use tools or a big paint brush he's all in.  Must be the boy in him.  Kind of like the other day when we went inside Charming Charlie's- after a minute or two he sweetly asked me- "Mommy, can boys be in here?"  That was an honest question.  He's just all boy and can't help it.  I guess all of the pink and sparkles were throwing him off a bit.


So after we found something to paint - which ended up being a piece of pallet wood we had in our shed- he chose to use the chalkboard paint.  And, he had a blast painting this thing.  It was like the most simplest of projects ever but it was his own personal project and he was into it.


The camera came out and he needed a few pictures to remember the moment.  I don't know why but when I want him to smile and be still for family shots he can't, but he can all of a sudden pose for this.  We have about 50 more of these photos.  I tried to get him to put something different on the sign but he won out in the end - this was his project after all.  He loves dinosaurs, that is that.


So do you guys have any fun go to indoor projects or activities you do with your kids?  I'd love to know!!  Share withe me!
  
Thanks for stopping by today!

Wednesday, November 19, 2014

Easy DIY Rustic Stars

Am I one of those people who has been listening to Christmas music for weeks now, has already scoped out Santa in the mall and has been using my Christmas mug like its the best thing ever?  Yes! I can't help it, I love the season of Christmas.  For so many reasons.  It's just such a sweet and joyful time of year.  The focus is always on the Joy that Jesus brings us and I can't help but love that.  I can listen to Andrew Peterson's Behold the Lamb of God 10,000 times in a row.  What a special time, so why not extend it for as long as you can?  I know there are some Thanksgiving lovers out there, and don't get me wrong I love a good Thanksgiving too.  I just love this whole season.  So with all that being shared, lets make a little Christmas project.  Its simple and easy and barely cost anything! 


When it comes to Christmas decor I love everything - but I do lean towards certain things more and rustic and homemade decor is just my favorite.  These stars meet both those criteria.

Supplies needed:
1. Wood Shims
2. Liquid Nails (and caulk gun)
3. Trash bags for a work surface or anything to protect your table


This is really the simplest project in the world.  The hardest part for me was finding the wood shims.  They seem to migrate around the hardware store so I always have to ask where they are.  Usually they are on some random end cap.


I always have a sweet helper with these projects,  I ended up making 3 stars, he was good for one and then had to go race cars. Priorities.


So really all you need to do is use your liquid nails to attach the wood shims together into a star shape.  I did lay out my shape first so I would have a good idea of where I was going and then went from there.  You will need to glue the ends and also the cross points.  Liquid nails is really forgiving to use if you have never used it before.  You have a good 10 minutes before it really starts drying so you can move and adjust as you need to.  Let them dry overnight and you're done! 


These stars really can go anywhere, outdoors, indoors, tree toppers, hanging, I could go on.  Also you could paint them, stain them, decorate them.  In the end I think I'm leaving mine just the way they are, I just love the kind of rustic feel it has. 

I can't wait to get working on more little Christmas projects...and maybe even some last minute Thanksgiving ones too.   Thanks for stopping by today!

Wednesday, January 29, 2014

Easy Valentine's Projects

Here in NC we are experiencing something we don't get to experience very often - snow.  And I love it!  So while we are hunkered down, enjoying our milk and bread that we frantically ran to the store yesterday to acquire - maybe a little crafting is a good option.  Monday I shared a glimpse of some of the Valentine crafts I had been working on, today I have a bunch more.


First up, a sweet and easy fabric hoop wreath.  Hoop wreaths are my new favorite thing.  For this one I used some leftover burlap, both felt and paper to make the little bunting and some little letter embellishments.  Of course, hot glue was my friend here.  No sewing required.

If you don't have a pattern punch, I highly recommend one.  This little garland was quick and simple.
After punching out a ton of flowers from some craft paper I simply glued two together along a strand of yarn.  These little garlands are now adorning our living room shelves.  My little deer also got in the spirit and is sporting a little felt rose boutonnière.  

These pinwheels are so sweet and simple.  I loved making them and you can whip a bunch out in a very short time.  Make sure you check out this tutorial - its awesome.


Another easy and simple, no sew option for a banner is knotting strips of fabric or ribbon on a strand of yarn.  I love the simplicity of these things.

We are getting pretty vintage up in here for Valentine's day.  To pull everything together I just walked around my house and stole things here and there that I liked and thought would flow together.  Such an easy way to change up a space and plus its free.


Slowing down for a moment and making something with your own two hands is such a mind clearing activity.  The theme of Valentine's day is love and I couldn't help but think clearly about the theme of our God - which is always and forever will be = Love.  His love is the only love and what all other loves spills out from.  We love because He first loved us.  What a beautiful thing to take some time to reflect on.

But God shows His love for us in that while we were still sinners, Christ died for us. Romans 5:8

Little children, let us not love in word or talk but in deed and in truth. 1 John 3:18

For I am sure that neither death nor life, nor angels nor rulers, nor things present nor things to come, nor powers, nor height nor depth, nor anything else in all creation, will be able to separate us from the love of God in Christ Jesus our Lord. Romans 8:38-39

Ok, I'm off to sled down some snowy hills, make a snowman, eat some snow cream and probably check out all of my favorite blogs.  

Thanks for stopping by!


Monday, January 27, 2014

Updating our Kitchen Chalkboard, plus a Valentine's Craft

I just like to paint things.  Nothing is safe in our house.  When I updated our little desk to navy it was pretty obvious I needed to update the kitchen chalkboard that hangs out with it as well.


Way back when, I found a nice sized piece of framed wood in our shed.  I'm really not sure what it was originally intended for but it looked like the perfect thing to turn into a chalkboard for our kitchen - so I did.  We have loved it but once again it was time for a change with some paint.  When our little desk received its navy paint update, the teal frame on our chalkboard was just not working with mint green walls and a navy desk.


I really considered white for the frame but I wasn't sold.  I checked our stash of paints and found a little paint sample I picked up a while back.


I'm pretty sure it was a pre-made sample that was on sale for $.50.  It was one of those, you never know purchases.  I can't help but always peruse the oops paint section at the hardware stores.  Sometimes there are decent colors to be had and at crazy cheap prices.  Matter of fact, our mudroom floor paint was found in the oops section. I scored a whole gallon of gray paint for $5.00 and then the nice lady tinted it darker for me.  So moral of the story, it never hurts to check out the paint when out and about.


A little tape around the edge and a couple of coats of paint and I was done.  Free, simple and quick.  I used a little foam roller and a small brush for the cracks.


As you can tell this chalkboard gets a lot of use.


I love the new update and I am loving the calmer feeling that we have going on in this little area of the house now.

Over the weekend Justin was out of town taking our students on their Winter Retreat so I took the time to be crafty and have a dance party.  I'm not normally one to decorate for Valentine's day but I got into the mood and couldn't stop.  I have some more to share tomorrow, but for now here is a little scrappy banner I whipped up - anyone can do this.


If you can cut with scissors and tie a knot, you are a crafter - fist bump.  I used old t-shirts, an old lace tablecloth and some ribbon...all from my scrap fabric stash.  Just cut a bunch of strips - they can be jagged and uneven it doesn't matter at all, t-shirt material is especially forgiving.  Then find some yarn, string or ribbon and tie all of your little strips along it.  


That's it, you have a sweet little scrappy, vintage looking banner to hang up anywhere your heart desires.


You can make these for any occasion and I have and will.  Tomorrow I have a bunch more Valentine's crafts to share with you, they are all easy too!  

Thanks for visiting, I'm off to celebrate my 33rd year today!


Monday, March 25, 2013

An Easy DIY Chalkboard Canvas

I promise I'm still here. Last week was just one of those tough weeks that included a pretty sick little boy.  Thankfully Silas is feeling much better, we have gotten some rest and things are feeling back to normal.   Honestly, taking an impromptu break from the blog was actually kind of nice for me.  I really was able to think about some different ideas and projects that I want to do and continue to try and learn some new bloggy things, so I was good with taking a break.  I have a a full week of blogging ahead to make up for last week and I'm looking forward to it.


I have a quick and easy project to share today as well as a few random weekend happenings.  First up is an easy chalkboard canvas.  This project actually comes via my sister.  A couple of weekends ago we had a big spray painting party and worked on a few things together.  My sister had this large canvas she wanted to change up and decided to try her hand at her first chalkboard project.  I was of course excited since I love a good chalkboard.  Here's the canvas before...


Just and old canvas print she had from a while back.  A couple of coats of chalkboard paint later and it was looking good.


My sister is kind of a newbie when it comes to spray painting but she learned quickly that lighter coats are better.  Spray paint can gloop and glob quickly so you just need to keep your can moving and keep the coats light to get the best coverage.  I believe though after this that she has caught the spray painting bug.  After it was all dry she decided on the text she wanted and we were done.  This was super easy.


Soon I'm going to grab some photos over at my sisters house so you can see where the canvas ended up.  They had this crazy design dilemma that I think they conquered well so I'm eager to share it.

Okay, on to some random things.  I think being gone a week from the blog is causing me to over share today.  I just missed connecting with all of you!  So, is it spring anywhere?  Because here in NC we have been thrown back into winter - its strange and we are so anxious for warmer weather.  Even so, we had a big easter egg hunt at our church this weekend.  We were glad to get Silas out of the house even if we had to be inside the gym to hunt eggs - it was so much fun for Silas.

Oh, this also occurred at our house this weekend.  This is not a new gallery wall technique - its a little thing called March Madness.   Each year Justin holds a big bracket challenge and the best and most fun way to do it is by hanging them all over your living room walls.  Its just a tradition that started a while back and has continued from house to house.  Lets just say that this year my brackets are awful.  I'm just pulling for Florida Gulf Coast to win it all now.


It feels so good to be sharing here today.  I have some more projects to share this week, a guest blogger, some garden inspiration and some more blog updates all happening.  Come back and visit with me!

Thanks so much for stopping by today!  How was your weekend? Any crazy March Madness traditions for you?  Share with me!

Wednesday, March 14, 2012

A Striped Silhouette

I have a fun project to share with you today!  So ever since I saw all of the adorable silhouette projects on pinterest I have been dying to make one of my own of my sweet little boy.  The thing is, I just haven't set the time aside to sit down and do it and instead, I've just been pinning and imagining a sweet little silhouette of Silas in my head.  Then, along comes the Pinterest Challenge and lights a fire under my behind.  So today I'm joining the ranks of great bloggers across the Nation who are taking on their pinning addiction and actually doing one of those really fun projects.  

Let me just tell you that this was one of those projects that I thoroughly enjoyed from start to finish and was super easy - and this is speaking from a person who is terrified of painting anything on a canvas with a tiny paintbrush.  I'm loving the finished product:


First, let me share my inspiration - here is my original Pin from the lovely Christina, aren't these adorable?


So, after checking out her lovely tutorial - I set off to decide what my silhouette would look like.  I decided to paint stripes on my canvas, mainly because I wanted to hang this up in my living room and it's in desperate need of some sort of color and pattern.

First thing was painting the stripes - now, I debated here on whether or not to paint the entire canvas white first and honestly- if I had to redo it I probably would.  But, since I tend to be impatient when working on any craft project I decided against it and went straight for the stripes.
I just used 1" painters tape and totally eyeballed the whole thing (because I'm impatient and didn't want to spend time measuring).


Once my stripes were taped on I used a little craft paint and painted over the canvas - I ended up painting two coats for better coverage.  


Then I got nervous because I was so convinced I would pull away the tape and reveal a giant mess.  But, to my surprise, it wasn't! And, actually looked pretty good.  It wasn't perfect - but the small imperfections are barely noticeable (especially when hanging up).  Next, I sighed a breath of relief knowing that I would not have to start over.


Ok, now for the silhouette part.  I needed a good profile picture of Silas to pull this off so I caught him at a good time when he was enthralled with Phineas and Ferb and took a quick shot of him before he realized what was going on - otherwise I would have never have gotten him to stand still for that long.  To enlarge it, I didn't use any fancy software I just uploaded it to my computer, pulled the picture into a page file and increased the size to fit a legal size document and printed it - simple.


Next I just cut out his profile, found the place I wanted it to go on my canvas and used a few pieces of painters tape to keep it still while I traced it.


And, then I had this:


This next part was the second scariest part for me because for some reason black paint makes me nervous plus I hate using a small paint brush, I'm just not skilled with it.  But, I just took in nice and slow around the traced line, using my paintbrush to outline the entire silhouette with my black paint.


These were the brushes I used, in case you were wondering.  I used the foam brush to fill in the larger area.


After a while my confidence in skinny paintbrush using was increasing and I was able to pull away with this - (this was my first coat and I did end up applying a second). whew.


And now he has a little spot in our living room to call home.


So cute right?


I love the stripes and the pop of color but the thing I love the most is my cute little Silas and this project just makes me smile every time I walk into this room.


Thanks so much for joining me today!  I'm joining up with the Pinterest Challenge and heading over to check out all of the other great projects that will be linked up!  Make sure you check out the awesome hosts projects: Sherry, Katie, Cassie & Erin.  

This project was so easy and fun and has totally inspired to get to working on more pinterest projects I have been procrastinating about.  So what about you?  Any pinterest projects looming in your pin boards that you are ready to tackle?  Have a great Wednesday!

Linking Up Here: